

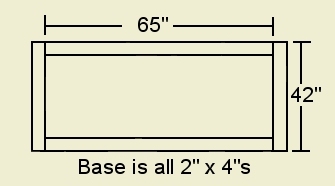
| 2"x 4" x 42" | base frame ends | ||
| 2"x 4" x 65" | base frame front and rear | ||
| 4"x 4" x 48" | corner posts (buy 2 8' posts and have the store cut them - it's easier to move them that way) |
||
| 1"x 4" x 42" | top frame ends | ||
| 1"x 4" x 72" | top frame front and rear | ||
| 1"x 6" x 42" | end wall sheathing (2 per end) | ||
| 1"x 6" x 72" | rear wall sheathing | ||
| 1"x 4" x 8" | ridge pole supports | ||
| 1"x 4" x 42" | ridge pole | ||
| 1"x 4" x 8' | rafters (cutting info is in the text below) | ||
| 2'x 4' x 1/4" | Luan plywood - roof | ||
| cedar shakes | roof | ||
| 6" | 12-gauge heavy strap tie | ||
| 4" | anchor plates | ||
| 2" | anchor plates | ||
| 3" x 5" | tie plates | ||
| #8 x 3/4" | pan-head metal screws | ||
| #8 x 1-1/4" | pan-head metal screws | ||
| pencil | |
| small Rapid Square | |
| chop saw | |
| philips-head screwdriver | |
| variable-speed drill with phillips-head bit | |
| 2 3" C-clamps | |
| utility knife to split/trim cedar shingles | |
| short stool to lay wood on when cutting and to stand on when working on the roof |

 Begin by assembling the bottom frame by laying out the 2"x4"s as shown above and connecting them using the 6" tie straps. Use all three holes at each end of the tie straps; use 1-1/4" pan-head screws to attach the straps to the 2"x4"s.
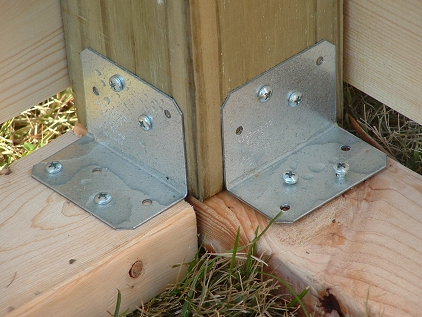
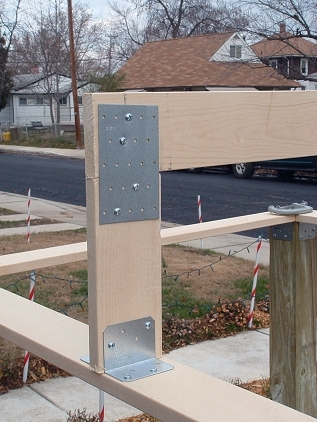
Next, attach four 4" anchors to each 4x4 corner post using two #8 x 3/4" screws on each anchor. The anchors should be placed on
adjacent sides, as shown in the picture. Place two anchors on each end of the posts
and on the same two sides at each end (see drawing).

Next, lay the base on the ground where you want the stable to be placed and attach the corner posts. Place one post on each end of the end pieces with the anchors facing
as shown in the photogrpah above. Secure the posts to the base frame with #8 x 3/4" screws, using two screws per anchor - again, as shown in the photograph above.
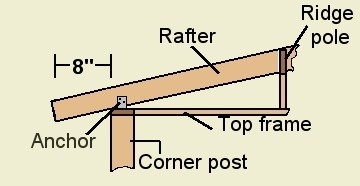
 Once all four corner posts are attached to the base pieces, it's time to attach the top frame pieces. As noted in the drawing at the beginning of this section, the
four pieces of the top frame are mitered at 45 degrees to join solidly atop the corner posts. This is important in that the front and rea pieces of the top frame support the ridge pole, so they must have solid footing on the corner posts.
Attach the top frame pieces to the anchors at the tops of the corner posts using #8 x 3/4" screws as was done when attaching the corner posts to the base frame.
When all the top frame pieces have been attached, apply the sheathing boards to the sides and rear of the frame using #8 x 1-1/4" screws. Place a scrap of 2" x 4" across the bottom frame to support the bottom sheathing board while it is secured;
this creates a space for electrical cords to pass through. When applying the upper boards, use a piece of 1" x 4" as a spacer.
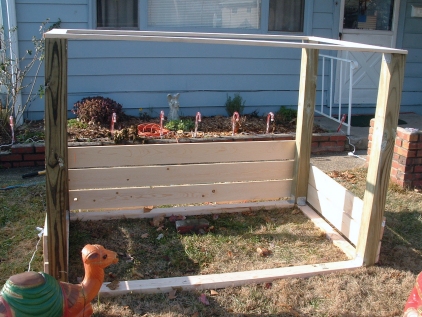
When this phase of construction is complete, you will have a framed box as shown in the photograph. Note that my frame
is sagging in the front right corner; this was fixed by placing a piece of 1" x 6" under the front right corner; since this is a temporary structure, no elaborate resolution was necessary.
The next phase of the construction is framing the roof. Begin by making the ridge pole/ridge support unit.
Once all four corner posts are attached to the base pieces, it's time to attach the top frame pieces. As noted in the drawing at the beginning of this section, the
four pieces of the top frame are mitered at 45 degrees to join solidly atop the corner posts. This is important in that the front and rea pieces of the top frame support the ridge pole, so they must have solid footing on the corner posts.
Attach the top frame pieces to the anchors at the tops of the corner posts using #8 x 3/4" screws as was done when attaching the corner posts to the base frame.
When all the top frame pieces have been attached, apply the sheathing boards to the sides and rear of the frame using #8 x 1-1/4" screws. Place a scrap of 2" x 4" across the bottom frame to support the bottom sheathing board while it is secured;
this creates a space for electrical cords to pass through. When applying the upper boards, use a piece of 1" x 4" as a spacer.
When this phase of construction is complete, you will have a framed box as shown in the photograph. Note that my frame
is sagging in the front right corner; this was fixed by placing a piece of 1" x 6" under the front right corner; since this is a temporary structure, no elaborate resolution was necessary.
The next phase of the construction is framing the roof. Begin by making the ridge pole/ridge support unit.
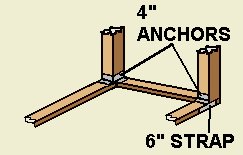
 The ridge pole is 42" long, the same as the end pieces; the two supports are each eight inches long, and all three pieces are made of 1" x 4" boards.
Working on a flat surface, lay the pieces together with the ridge pole at the top and one support lined up under each end of the ridge pole. Join each support piece to the ridge pole with a 3" x 5" tie plate, fastening the tie plates using
#8 x 3/4" screws.
The ridge pole is 42" long, the same as the end pieces; the two supports are each eight inches long, and all three pieces are made of 1" x 4" boards.
Working on a flat surface, lay the pieces together with the ridge pole at the top and one support lined up under each end of the ridge pole. Join each support piece to the ridge pole with a 3" x 5" tie plate, fastening the tie plates using
#8 x 3/4" screws. NOTE: before applying the tie plate, place a scrap of 1" x 4" on edge against the END of the ridge pole and mark the ridge pole - there will be a 3/4" space marked on the ridge pole; this leaves space for the outermost rafter. Next, place a 2" anchor plate so that the bend is against the INSIDE of the line on the ridge pole and the top edge of the anchor is even with the top of the ridge pole; trace the 2" anchor. Use the intersection of the lines to locate the top left-hand corner (or top right-hand corner, depending on which side of the assembly you're working on) of the tie plate.
When both supports have been attached, flip the assembly
over and repeat the process.
Now attach a 4" anchor to each side of the bottom of each ridge support. the
first anchor can be attached on the same flat surface on which the ridge and supports
were fastened together, but the anchors on the opposite sides will have to be
attached with the end of the supports hanging over an edge such as a step.
Place the ridge/support assembly on top of the top frame with one end resting on the
front of the top frame and the other end on the rear piece of the top frame.
Position the assembly so that one face of each support is 45" from the left side of the
stable (as viewed from the front). Clamp the assembly in place and secure
both ends to the top frame using #8 x 3/4" screws.
Now comes the fun part: the rafters.
 The rafters are in pairs, one long and one short.
One pair of rafters can be cut from one 8' long 1" x 4" board. To get the angle for a long rafter, have a helper hold one end of an 8'-long board so that it extends eight inches
past the end of the stable as measured along the bottom of the board. Align
the top of the board with the top inside corner (the one facing your helper) of the ridge
pole and draw a line along the board where it meets the ridge pole.
Since the angle is an odd one, you won't be able to simply flip the leftover piece of
board and use it for the short rafter - besides, it's too long. With the assistance
of your helper, repeat the steps followed for the long rafter, above.
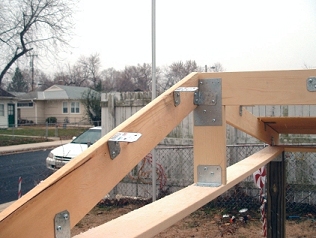
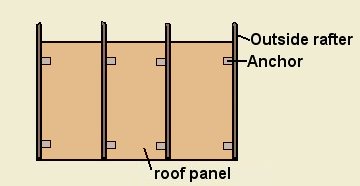
When all the rafters have been cut, secure them to the top frame and to the ridge pole
using 2" anchors and #8 x 3/4" screws, spacing the interior rafters 13" from the
adjacent outeside rafter. When attaching the rafters to the ridge pole, place
the short leg of the anchor on the ridge pole to ensure that enough of
the anchor extends onto the rafter to provide ample distance between the lower screw
and the bottom of the rafter to avoid splitting the wood.
The final pieces of hardware to be applied to the roof structure are the roof
retaining anchors - the same kind of anchor used to attach the rafters to the top
frame and to the ridge pole.
The rafters are in pairs, one long and one short.
One pair of rafters can be cut from one 8' long 1" x 4" board. To get the angle for a long rafter, have a helper hold one end of an 8'-long board so that it extends eight inches
past the end of the stable as measured along the bottom of the board. Align
the top of the board with the top inside corner (the one facing your helper) of the ridge
pole and draw a line along the board where it meets the ridge pole.
Since the angle is an odd one, you won't be able to simply flip the leftover piece of
board and use it for the short rafter - besides, it's too long. With the assistance
of your helper, repeat the steps followed for the long rafter, above.
When all the rafters have been cut, secure them to the top frame and to the ridge pole
using 2" anchors and #8 x 3/4" screws, spacing the interior rafters 13" from the
adjacent outeside rafter. When attaching the rafters to the ridge pole, place
the short leg of the anchor on the ridge pole to ensure that enough of
the anchor extends onto the rafter to provide ample distance between the lower screw
and the bottom of the rafter to avoid splitting the wood.
The final pieces of hardware to be applied to the roof structure are the roof
retaining anchors - the same kind of anchor used to attach the rafters to the top
frame and to the ridge pole.
 There are multiple anchors per roof section, with two or three per rafter depending upon the size of the roof panel. These anchors are attached to the rafters using #8 x 3/4"
screws and are fastened to the underside of the roof panels with #6 x 3/8" screws.
Note: the anchors should be fastened to the rafters, using #8x3/4" scews, prior to the roof panels being applied. We used a lot of anchors to keep the roof fom warping.
There are multiple anchors per roof section, with two or three per rafter depending upon the size of the roof panel. These anchors are attached to the rafters using #8 x 3/4"
screws and are fastened to the underside of the roof panels with #6 x 3/8" screws.
Note: the anchors should be fastened to the rafters, using #8x3/4" scews, prior to the roof panels being applied. We used a lot of anchors to keep the roof fom warping.
|
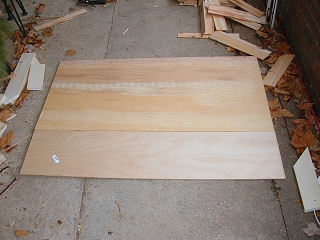
The last phase of construction is the roof itself. Begin by cutting all your
odd-size roof panels; these will be the panels that form the peak of the roof.
Measure along a long and short outside rafter and figure out how many full panels
will fit, then subtract that from the total length to get the size of the odd panel.
For example, if the long rafter is 57" and the roof panels are 24" x 48", the odd panel will be 9" wide (57" - (2 x 24")). NOTE that the roof panels are laid on the rafters with the long side running across the rafters and the short ends running along the rafters.
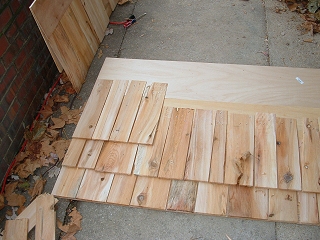
To attach the cedar shakes, first place all the panels for one side
of the roof on a flat, level surface with the long edges together.
Now, starting at what will be the bottom of the roof, begin attaching the shakes to the panels using carpenter's glue and a staple gun loaded with 3/8" staples
and applying three or four staples through the thin end of
each shake into the plywood panel.
When you get to a point where the next row of shakes will extend
beyond the joint between two roof panels, just glue and staple the shake to the
upper panel (this is why you laid all the roof panels together before
you started applying the shakes).
|
crab logo, stable design, line art and photographs ©2005 Calo Creations LLC; all rights reserved
View my Guestbook
Free Guestbooks by Bravenet.com
Merry Christmas!