
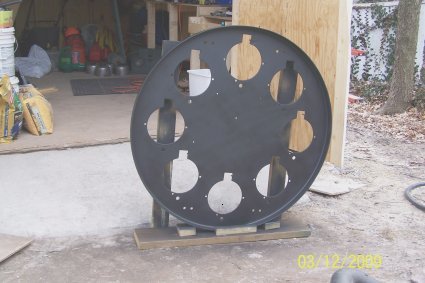
 Okay, I still haven't done the bezel rings. This time I got distracted by the
really nice weather and a 42-inch signal background. It took ten sheets of
sandpaper, ripped into quarters, and three days of sanding with an orbital sander to get down
to bare metal. I thought I'd NEVER get done, but I did - and it was worth the effort: I
spent a lot of time outdoorsd (I did the sanding in front of my shed, resting the background
on a cradle that I threw together out of a 2 x 6, a couple of 2x4 uprights and a 2x4 ripped
into several pieces to create a "pocket" for the background to rest in without rolling away).
Okay, I still haven't done the bezel rings. This time I got distracted by the
really nice weather and a 42-inch signal background. It took ten sheets of
sandpaper, ripped into quarters, and three days of sanding with an orbital sander to get down
to bare metal. I thought I'd NEVER get done, but I did - and it was worth the effort: I
spent a lot of time outdoorsd (I did the sanding in front of my shed, resting the background
on a cradle that I threw together out of a 2 x 6, a couple of 2x4 uprights and a 2x4 ripped
into several pieces to create a "pocket" for the background to rest in without rolling away).
I also saved about $150 doing it myself...
Then I used two and a half cans of flat black Rustoleum to put three coats of paint on the background. Sure looks different from when I started...

OK...I finally broke down and did the bezel rings. Actually I needed a break in the weather because I had to paint them outside. Fortunately there was only minor surface rust so cleanup didn't take long at all, and on a really nice day (around 60 degreees) I painted all the large metal pieces to my CPL.
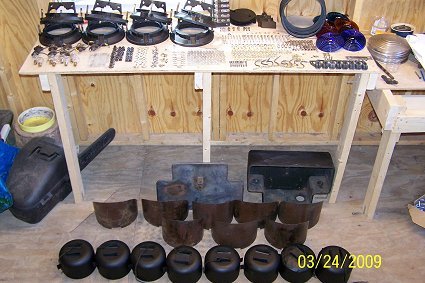 The next thing I did was gather all the pieces back in my shed workshop, as shown in the photo
(missing are the background and the new outer lenses; the chainsaw is not part of the signal)
and begin the reassembly process. As I suspected soon after dismantling the
signal, the signal is NOT as easy to get back together as it was to get apart.
The next thing I did was gather all the pieces back in my shed workshop, as shown in the photo
(missing are the background and the new outer lenses; the chainsaw is not part of the signal)
and begin the reassembly process. As I suspected soon after dismantling the
signal, the signal is NOT as easy to get back together as it was to get apart.
Not by a long shot.
It tok me FIVE attempts at reassembling the first lamp unit until I figured out which pieces went where and in which order. Fortunately I took lots of pictures and made lots of reference drawings as I disassembled the CPL so I had a good idea of how to go about putting it back together - trouble was, my drawings were done in a hurry and took some deciphering to figure out at first.
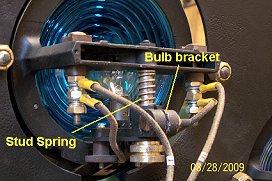 Okay - new day, new revelation. And another disassembly and reassemly of the wiring
because I forgot to put the stud springs in before I mounted the bulb brackets. Of course,
I didn't realize this until I had mounted the fourth bezel ring to the bagkground and noticed
that I had too many springs left. Sigh...now all I have to do is fix the other two lamp
units that I've already wired and try to remember the springs on the last four lamp
units.
Okay - new day, new revelation. And another disassembly and reassemly of the wiring
because I forgot to put the stud springs in before I mounted the bulb brackets. Of course,
I didn't realize this until I had mounted the fourth bezel ring to the bagkground and noticed
that I had too many springs left. Sigh...now all I have to do is fix the other two lamp
units that I've already wired and try to remember the springs on the last four lamp
units.
And now the signal is starting to get heavy again. Yay.
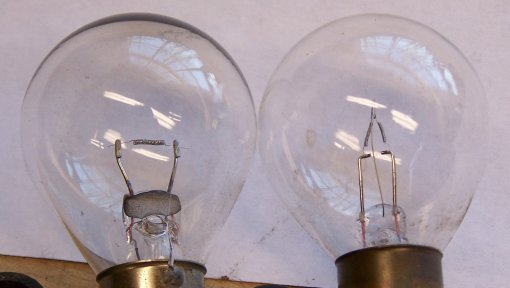 On the "bright" side (I'm sorry, I couldn't resist), I found out from a fellow signal fan, Abe,
that six of the eight bulbs in my signal are 10-volt, 18-watt "signal precision lamps" which
cast a beam 3,500 - 4,000 feet; the remaining two bulbs are #1141 12-volt automotive bulbs,
which "scatter" the light more (as you can see at night when your headlights are on - the
lighted area ahead of you is very wide but doesn't extend too far in front of your car).
The accompanying photo shows one of each type of bulb; click on the picture and a larger
picture will open in a new window. In that larger view you will be able to see the distinct
differences between the two types of bulbs: the automotive bulb has the larger, straight
springlike filament, whereas the signal bulb has two filaments mounted in an arrowhead
configuration.
On the "bright" side (I'm sorry, I couldn't resist), I found out from a fellow signal fan, Abe,
that six of the eight bulbs in my signal are 10-volt, 18-watt "signal precision lamps" which
cast a beam 3,500 - 4,000 feet; the remaining two bulbs are #1141 12-volt automotive bulbs,
which "scatter" the light more (as you can see at night when your headlights are on - the
lighted area ahead of you is very wide but doesn't extend too far in front of your car).
The accompanying photo shows one of each type of bulb; click on the picture and a larger
picture will open in a new window. In that larger view you will be able to see the distinct
differences between the two types of bulbs: the automotive bulb has the larger, straight
springlike filament, whereas the signal bulb has two filaments mounted in an arrowhead
configuration.
Oh, and guess what? I've done it to myself again. No matter how much I concentrate on this stuff, I continue to screw it up: the wiring harnesses are on incorrectly, so now I have to UNwire everything - AGAIN - and start over. Sigh. I have to come up with a temporary way to color-code the leads before I connect them to the lamps...

 Continued...
 Back to Mike's Railroad Page